Initializing Teak
-
Update your main 'APP_NAME’App.swift file and add the Teak initialization code.
Replace YOUR_TEAK_APP_ID and YOUR_TEAK_API_KEY with your Teak App ID and Teak API Key.
Example Initimport SwiftUI import Teak @main struct TeakSwiftUIDemoApp: App { @UIApplicationDelegateAdaptor(AppDelegate.self) var appDelegate init() { Teak.initSwiftUI(forApplicationId: "YOUR_TEAK_APP_ID", andApiKey: "YOUR_TEAK_API_KEY") } var body: some Scene { WindowGroup { ContentView() } } } class AppDelegate : NSObject, UIApplicationDelegate { func application(_ application: UIApplication, didFinishLaunchingWithOptions launchOptions: [UIApplication.LaunchOptionsKey : Any]? = nil) -> Bool { Teak.requestNotificationPermissions({ accepted, error in print("Player accepted notifications: \(accepted)") }) Teak.login("YOUR_PLAYER_ID", with: TeakUserConfiguration()) return true } }This is Example CodeThe above example code will request notificaton permissions immediately on application launch, and tell Teak that the player is "YOUR_PLAYER_ID". This should not be used in production. Instead, call
Teak.requestNotificationPermissions()at a time where it makes sense to ask the player if you can send them push notifications, and callTeak.login()with a real player id.What Player ID should you use?Your game probably has a player ID to store progress, coin balances, and other useful data. Use that ID with Teak too.
-
It should uniquely identify the current player.
-
Ideally the same ID that is used in your game’s backend.
-
Send it as early as possible in the game’s lifecycle.
Having a consistent ID between your game makes customer support easier, and makes life easier for your analytics team.
-
Build Your Game
At this point, Teak is ready to to be tested on device or in the simulator.
-
Build your game and get it running on a device or in the simulator.
-
Approve the system prompt asking for push notification permissions.
See Your Active User
-
Open the Teak Dashboard and navigate to your game.
-
If the Teak integration is working and
loginis being called, you will see yourself in the active user chart on the dashboard.
-
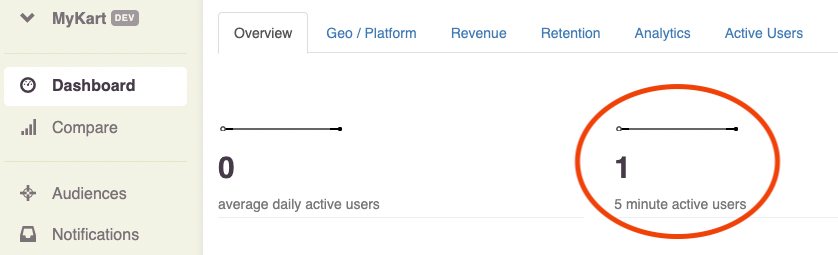
If you’ve got an active user showing here, you are ready to test notification sends.