Install the Teak SDK

It’s time to configure your project for push notifications and install the Teak SDK.

Adding Required Capabilities

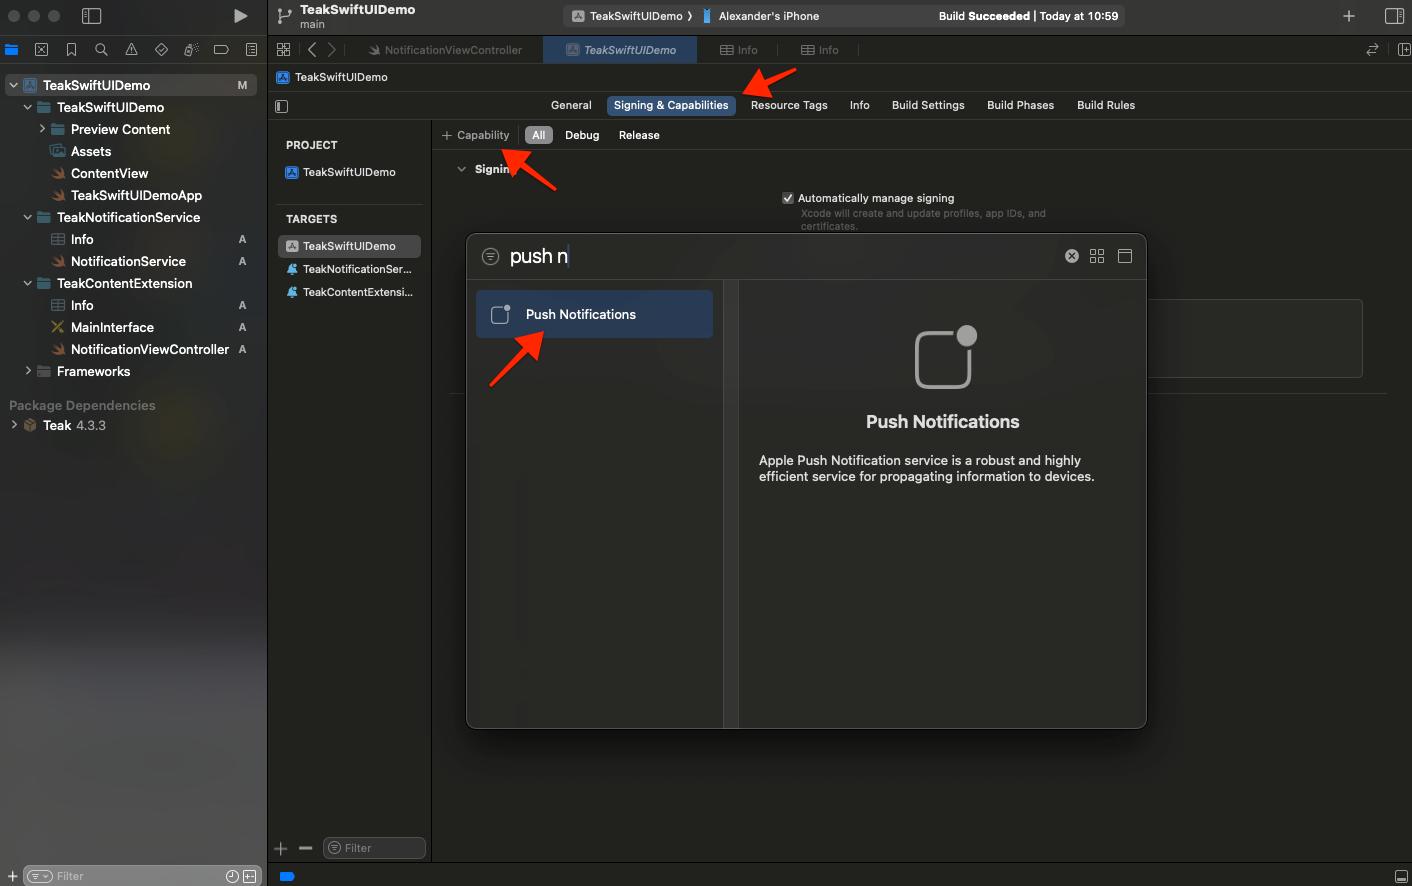
  1. With your Xcode Project open, select your app target → Signing & Capabilities

    Click + Capability and add Push Notifications

    add push cap
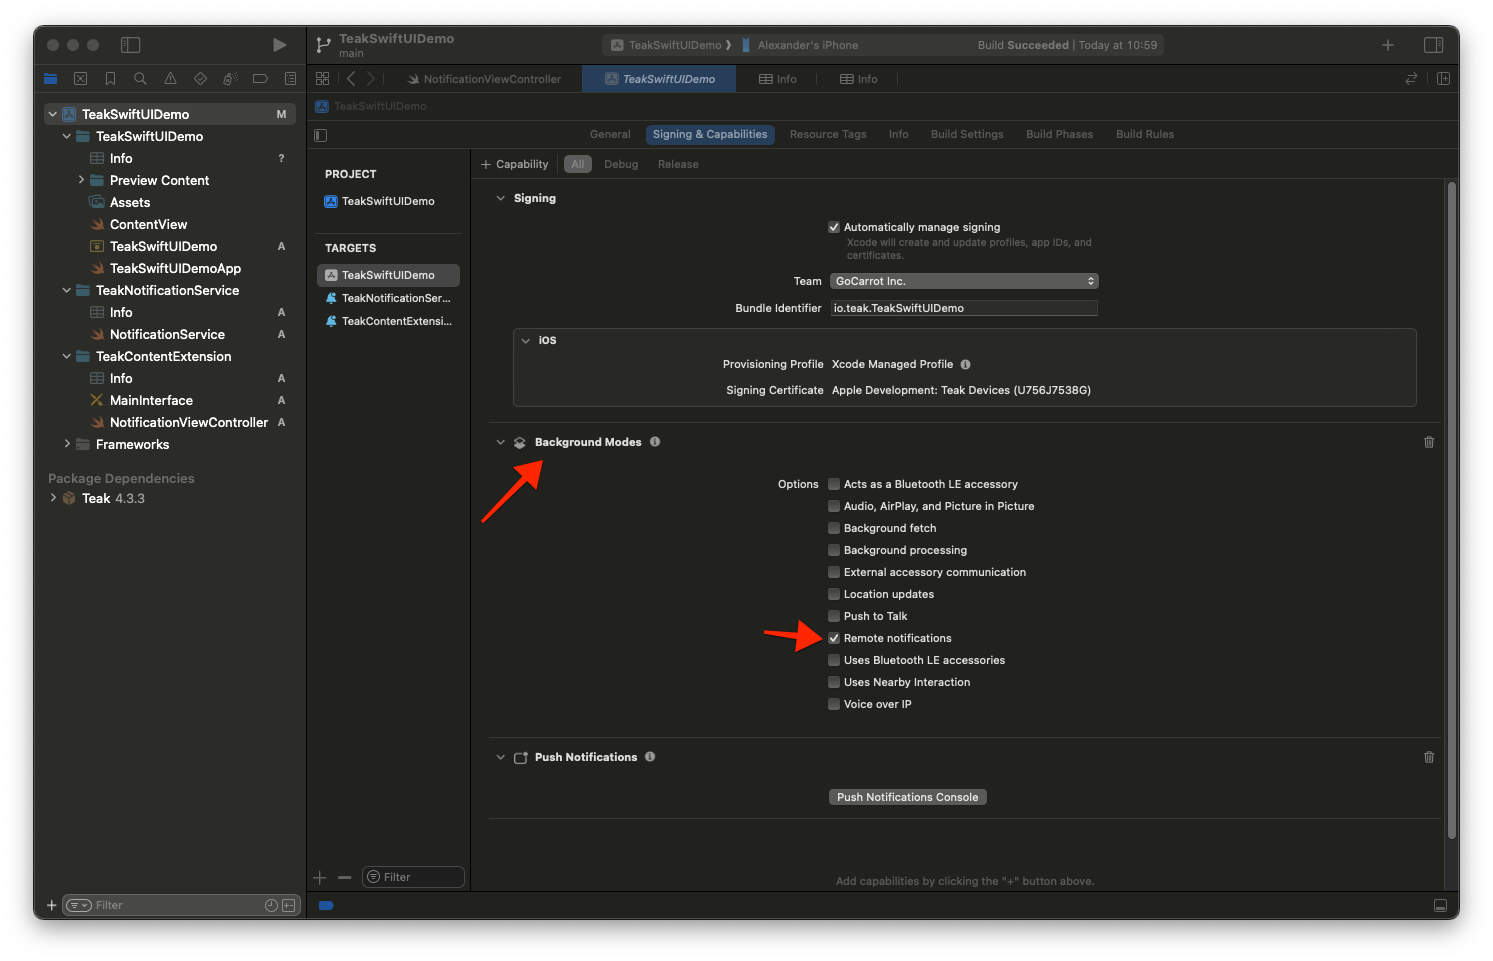
  2. Click + Capabiity again and add Background Modes. Then check Remote notifications

    remote cap
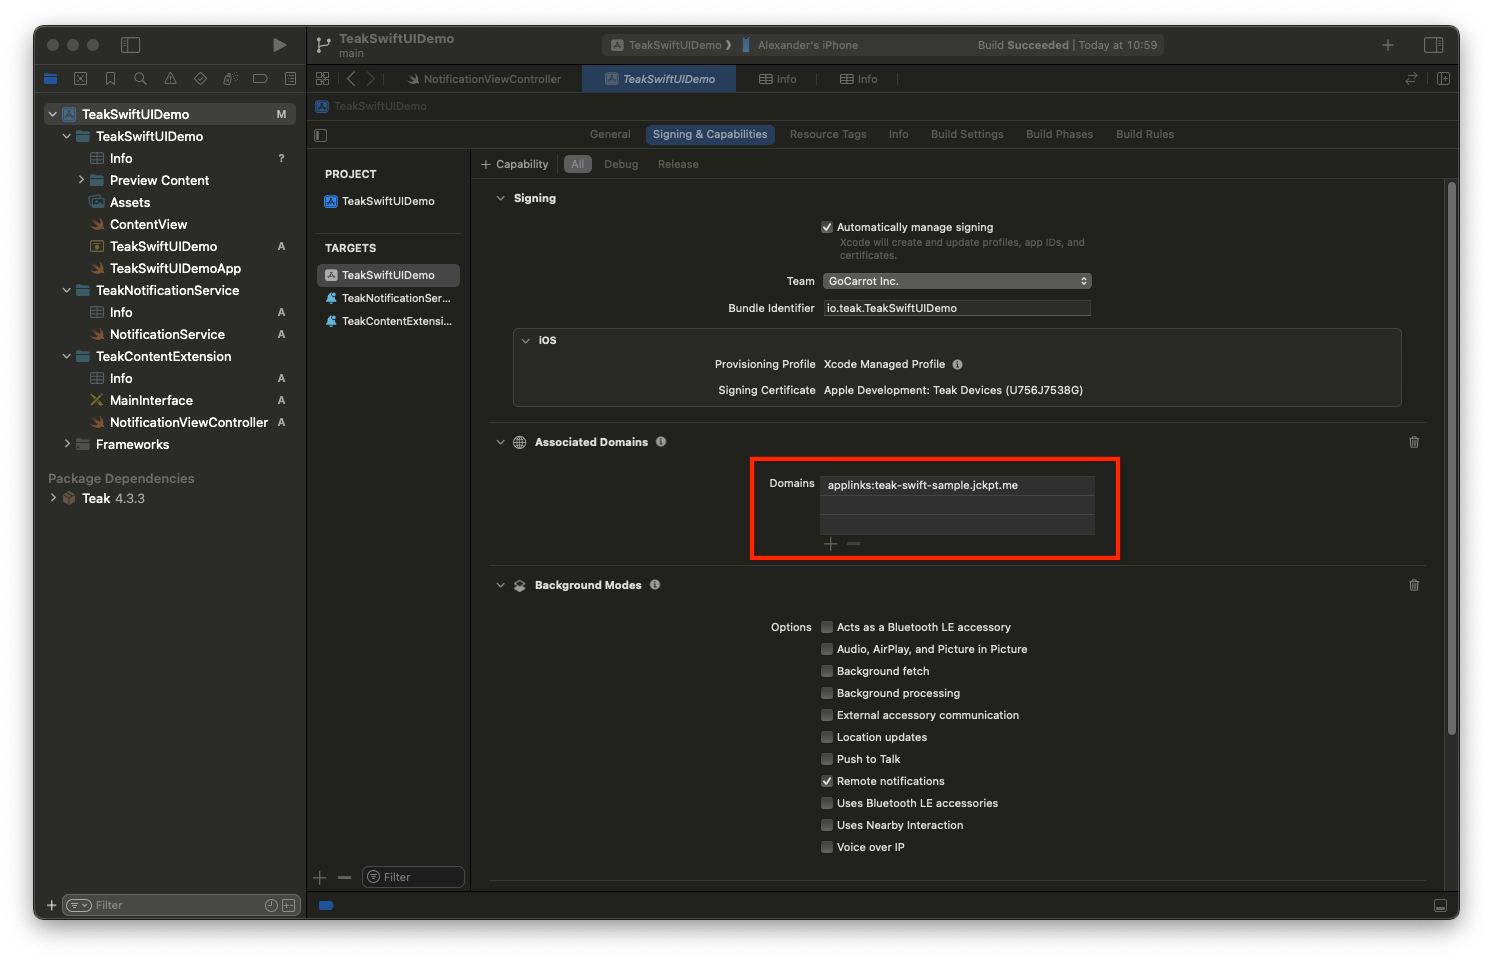
  3. Click + Capbility again and add Associated Domains

    Add applinks:<ShortLink Domain from the Teak Dashboard> as an associated domain

    domain cap
  4. Change to the Info tab and add a new URL Type.

    Set the Identifier to Teak

    Set the URL Schemes to teakYOUR_APP_ID, where YOUR_APP_ID should be the Teak App ID for your game on the Teak Dashboard.

    Set the Role to Viewer image::quickstart/url-scheme.png[]

Add the Teak SDK to a SwiftUI Application

The Teak SDK can be added as a Swift Package or through CocoaPods. We recommend using the Swift Package Manager if you are not already using CocoaPods.

Adding the SDK and Rich Push Extensions

  1. With your Xcode Project open, Select Your Project → Package Dependencies → + button

    add swift package
  2. Enter Package URL: https://github.com/GoCarrot/teak-ios-framework

    Make sure Dependency Rule is set to Up to Next Major Version

    swift package config
  3. Add the Teak and TeakExtension libraries to your Application Target and click Add Package

    swift package selection
  4. Click the + button to add a new target.

    add target button
  5. Select Notification Service Extension then Next

    notification service extension
  6. Enter the product name as TeakNotificationService and click Finish

    Do not active the scheme on the dialog that is shown after clicking Finish.

    Press Don’t Activate on the Activate scheme prompt.

    add service extension
  7. Open the NotificationService file and replace its contents with

    Notification Service
    import TeakExtension
    
    class NotificationService: TeakNotificationServiceCore {
        override func serviceExtensionTimeWillExpire() {
            super.serviceExtensionTimeWillExpire()
        }
    }
    notification service code
  8. Select the TeakNotificationService target → Build PhasesLink Binary With Libraries+

    link service library
  9. Select Teak Extension and click Add

    add teak extension
  10. Click the + button to add a new target.

    add target button
  11. Select Notification Content Extension then Next

    notification content extension
  12. Enter the product name as TeakContentExtension and click Finish

    Do not active the scheme on the dialog that is shown after clicking Finish.

    Press Don’t Activate on the Activate scheme prompt.

    add content extension
  13. Open the NotificationViewController file and replace its contents with

    Notification View Controller
    import TeakExtension
    
    class NotificationViewController: TeakNotificationViewControllerCore {
        override func viewDidLoad() {
            super.viewDidLoad()
        }
    }
    notification extension code
  14. Open the Info file with an External Editor

    info external editor

    Replace its contents with

    Content Extension Info.plist
    <?xml version="1.0" encoding="UTF-8"?>
    <!DOCTYPE plist PUBLIC "-//Apple//DTD PLIST 1.0//EN" "http://www.apple.com/DTDs/PropertyList-1.0.dtd">
    <plist version="1.0">
    <dict>
        <key>NSExtension</key>
        <dict>
            <key>NSExtensionAttributes</key>
            <dict>
                <key>UNNotificationExtensionCategory</key>
                <array>
                    <string>TeakNotificationContent</string>
                    <string>TeakNotificationPlayNow</string>
                    <string>TeakNotificationClaimForFree</string>
                    <string>TeakNotificationBox123</string>
                    <string>TeakNotificationGetNow</string>
                    <string>TeakNotificationBuyNow</string>
                    <string>TeakNotificationInteractiveStop</string>
                    <string>TeakNotificationLaughingEmoji</string>
                    <string>TeakNotificationThumbsUpEmoji</string>
                    <string>TeakNotificationPartyEmoji</string>
                    <string>TeakNotificationSlotEmoji</string>
                    <string>TeakNotification123</string>
                    <string>TeakNotificationFreeGiftEmoji</string>
                    <string>TeakNotificationYes</string>
                    <string>TeakNotificationYesNo</string>
                    <string>TeakNotificationAccept</string>
                    <string>TeakNotificationOkay</string>
                    <string>TeakNotificationYesPlease</string>
                    <string>TeakNotificationClaimFreeBonus</string>
                </array>
                <key>UNNotificationExtensionDefaultContentHidden</key>
                <false/>
                <key>UNNotificationExtensionInitialContentSizeRatio</key>
                <real>0.01</real>
                <key>UNNotificationExtensionUserInteractionEnabled</key>
                <true/>
            </dict>
            <key>NSExtensionPointIdentifier</key>
            <string>com.apple.usernotifications.content-extension</string>
            <key>NSExtensionPrincipalClass</key>
            <string>$(PRODUCT_MODULE_NAME).NotificationViewController</string>
        </dict>
    </dict>
    </plist>
  15. Select the TeakContentExtension target → Build PhasesLink Binary With Libraries+

    link service library
  16. Select Teak Extension and click Add

    add teak extension

Initializing Teak

  1. Update your main 'APP_NAME’App.swift file and add the Teak initialization code.

    Replace YOUR_TEAK_APP_ID and YOUR_TEAK_API_KEY with your Teak App ID and Teak API Key.

    Example Init
    import SwiftUI
    import Teak
    
    @main
    struct TeakSwiftUIDemoApp: App {
        @UIApplicationDelegateAdaptor(AppDelegate.self) var appDelegate
    
        init() {
            Teak.initSwiftUI(forApplicationId: "YOUR_TEAK_APP_ID", andApiKey: "YOUR_TEAK_API_KEY")
        }
    
        var body: some Scene {
            WindowGroup {
                ContentView()
            }
        }
    }
    
    class AppDelegate : NSObject, UIApplicationDelegate {
        func application(_ application: UIApplication, didFinishLaunchingWithOptions launchOptions: [UIApplication.LaunchOptionsKey : Any]? = nil) -> Bool {
            Teak.requestNotificationPermissions({ accepted, error in
                print("Player accepted notifications: \(accepted)")
            })
    
            Teak.login("YOUR_PLAYER_ID", with: TeakUserConfiguration())
    
            return true
        }
    }
    This is Example Code

    The above example code will request notificaton permissions immediately on application launch, and tell Teak that the player is "YOUR_PLAYER_ID". This should not be used in production. Instead, call Teak.requestNotificationPermissions() at a time where it makes sense to ask the player if you can send them push notifications, and call Teak.login() with a real player id.

    What Player ID should you use?

    Your game probably has a player ID to store progress, coin balances, and other useful data. Use that ID with Teak too.

    • It should uniquely identify the current player.

    • Ideally the same ID that is used in your game’s backend.

    • Send it as early as possible in the game’s lifecycle.

    Having a consistent ID between your game makes customer support easier, and makes life easier for your analytics team.

Build Your Game

At this point, Teak is ready to to be tested on device or in the simulator.

  • Build your game and get it running on a device or in the simulator.

  • Approve the system prompt asking for push notification permissions.

See Your Active User

  • Open the Teak Dashboard and navigate to your game.

    • If the Teak integration is working and login is being called, you will see yourself in the active user chart on the dashboard.

activeuser
Figure 1. The lone tester, playing the game.

If you’ve got an active user showing here, you are ready to test notification sends.