Add Required Code
In order to send a push notification, you need to do three things in your game’s code:
-
Initialize Teak so it can hook into the Android app lifecycle.
-
Tell Teak who the player is with
identifyUser. -
Ask the player for permission to send them push notifications.
Initialize Teak
The easiest way to initialize Teak is to let it piggyback on Firebase’s initialization of ContentProviders.
Add this meta-data element inside the <application> tag of your AndroidManifest.xml:
<meta-data android:name="io.teak.sdk.initialize" android:value="true"/>That’s it for most games. If auto-initialization works for you, skip to Identify the Player.
Initialize Manually (Optional)
If you don’t want to use auto-initialization, add the Teak calls to your main activity yourself.
-
Import Teak into your main activity:
import io.teak.sdk.Teak; -
Call
Teak.onCreate(Activity)beforesuper.onCreate:protected void onCreate(Bundle savedInstanceState) { Teak.onCreate(this); super.onCreate(savedInstanceState); // ... etc }Always call Teak.onCreate(Activity)before the call tosuper.onCreate. -
Call
setIntent()inonNewIntentso Teak sees notification launches:protected void onNewIntent(Intent intent) { super.onNewIntent(intent); setIntent(intent); // << Add this line }
This lets Teak hook into the Android app lifecycle, configure itself, and begin sending information to the Teak service.
Identify the Player
Teak’s functionality depends on knowing when a player plays and on what device.
As early as possible in your game’s lifecycle, once you know who the current player is, send their ID to Teak with Teak.identifyUser().
|
What Player ID should you use?
Your game probably already has a player ID to store progress, coin balances, and other useful data. Use that ID with Teak too.
Having a consistent ID between your game and Teak makes customer support easier, and makes life easier for your analytics team. |
Teak.UserConfiguration userConfiguration = new Teak.UserConfiguration(); (1)
Teak.identifyUser(YOUR_USER_ID, userConfiguration); (2)| 1 | An empty UserConfiguration is fine to start. We’ll add data to it next. |
| 2 | YOUR_USER_ID must be unique to the player. We highly recommend using the same ID you use in your game’s backend. |
This is enough to begin tracking and reporting of a session, and to track a daily active user.
Sending Additional Data
You can pass more about the player through UserConfiguration. For example, adding an email address and a Facebook ID enables sending emails and templating a player’s real name into your content.
Teak.UserConfiguration userConfiguration =
    new Teak.UserConfiguration(YOUR_USER_EMAIL, YOUR_USER_FACEBOOK_ID);
Teak.identifyUser(YOUR_USER_ID, userConfiguration);-
Null and empty strings are ignored. Any previously set email or Facebook ID for the player remains set.
-
To update player data during a session, call
identifyUseragain with the new data. This updates player data without starting a new session. -
UserConfigurationalso lets you opt a player out of specific data collection. See theUserConfiguration Docsfor the available options.
Ask the Player for Push Permissions
On Android 13 (API level 33) and newer, you must ask the player before you can send them notifications. Teak does not request this permission for you — use Android’s standard runtime permission APIs.
In the long term, you can increase your opt-in rates by being strategic about when you ask. Ideally, you’d ask at a moment that makes sense for your game. For getting up and running fast, let’s request permission right at launch for now.
private final ActivityResultLauncher<String> requestPermissionLauncher =
    registerForActivityResult(new RequestPermission(), isGranted -> {
        // Handle the player's response here.
    });

protected void onCreate(Bundle savedInstanceState) {
  super.onCreate(savedInstanceState);

  if (Build.VERSION.SDK_INT >= Build.VERSION_CODES.TIRAMISU
      && ContextCompat.checkSelfPermission(this, Manifest.permission.POST_NOTIFICATIONS)
             != PackageManager.PERMISSION_GRANTED) {
    requestPermissionLauncher.launch(Manifest.permission.POST_NOTIFICATIONS);
  }
}
Now your game will ask for push permissions when it launches. Make sure to approve them on your test device, so we can send our notification at the end of this guide.
Testing Your Teak Installation
Run your game on an Android device and look at the Android debug log output. When Teak initializes, you should see a teak.state log entry:
{
  "event_type":"teak.state",
  "log_level":"INFO",
  "timestamp":"<timestamp>",
  "event_data": {
    "state":"Created",
    "old_state":"Allocated"
  },
  "event_id":1,
  "sdk_version": {
    "android":"<android-sdk-version>"
  },
  "run_id":"<some-guid>"
}
…along with many other Teak log entries.
|
If you don’t see Teak debug log messages, make sure your game is being built in debug mode. If you see |
See Your Active User
Open the Teak Dashboard and navigate to your game.
If the integration is working and identifyUser is being called, you’ll see yourself in the active user chart on the dashboard.
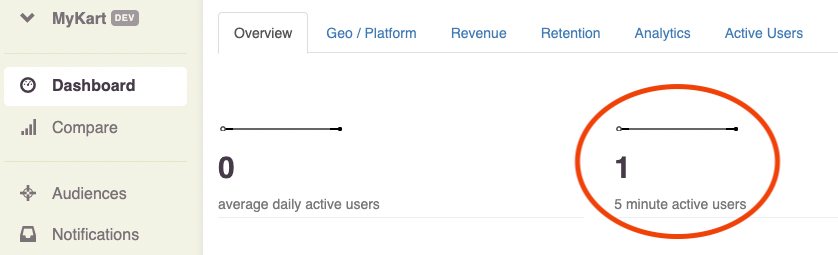
If you’ve got an active user showing here, you’re ready to test a notification send.