Add Required Code
In order to send a Web Push notification, you need to
-
Tell Teak who the player is with
login. -
Ask the player for permission to send them push notifications.
Login
Teak’s functionality depends on knowing when a user plays and on what device they play.
At every game launch, send the player’s ID to Teak using window.teak.login().
|
What Player ID should you use?
Your game probably has a user ID to store progress, coin balances, and other useful data. Use that ID with Teak too.
Having a consistent ID between your game makes customer support easier, and makes life easier for your analytics team. |
In our game script, as soon as we know the id for our current player, we’ll add our call.
// ...
const additionalData = {}; (1)
window.teak.login(YOUR_PLAYER_ID, additionalData); (2)| 1 | We create an empty additionalData object for now. We’ll add data to that in the next step. |
| 2 | Your YOUR_PLAYER_ID string must be unique to the player. Again, we highly recommend using the same player id you use in your game’s backend. |
This is enough to begin tracking and reporting of a session and tracking a daily active user.
Sending Additional Data
Next we’ll add some data to our additionalData
Here’s how we would add an email address and their Facebook ID. This will enable sending emails and templating a player’s real name into our notification and email content.
// ...
const additionalData = {
  email: YOUR_PLAYER_EMAIL,
  facebook_id: YOUR_PLAYER_FACEBOOK_ID
}
window.teak.login(YOUR_PLAYER_ID, additionalData);-
Null, undefined, and empty strings will be ignored. Any previously set email address or Facebook ID for the player will remain set.
Ask the Player for Push Permissions
To send a Web Push you are required to ask the player if you can send them notifications. Do that with the window.teak.registerForNotifications() call.
In the long term, you can increase your notification opt-in rates by being strategic about when you ask for permission. Ideally, you would ask for these permissions at a time that makes sense for your game. For best results, show an in-app prompt first asking the player if they would like to receive notifications before calling window.teak.registerForNotifications(). If your game has a timed bonus mechanic we would recommend displaying your in-app prompt after the player first collects their bonus and telling the player that if they approve notifications they can be notified when their bonus is ready and receive other offers.
For the purpose of getting up and running fast, let’s put the permissions request right at game launch, for now.
// ...
window.teak.registerForNotifications(true, (state) => {
  console.log("Web Push notifications are " + state);
});
Now your game will ask for push permissions when you launch the game. Make sure to approve them on your test device, so that we can send our notification at the end of this tutorial.
Testing your Teak Installation
To confirm successful setup of the Teak SDK, deploy your updated code to a page served over https, then load it.
You should observe the following messages in the browser console when Teak is initialized and you have granted push permissions
Teak: I am Production build SDK_VERSION
Teak: Initializing application YOUR_TEAK_APP_ID
Web Push notifications are Enabled
See Your Active User
-
Open the Teak Dashboard and navigate to your game.
-
If the Teak integration is working and
loginis being called, you will see yourself in the active user chart on the dashboard.
-
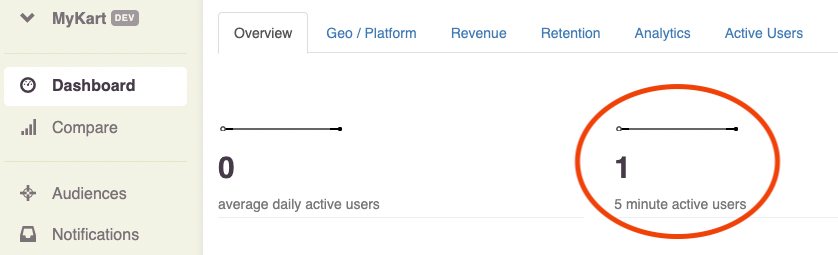
If you’ve got an active user showing here, you are ready to test notification sends.